aws_instance 리소스
이번 시간엔 본격적으로 EC2를 생성해보자. 우선 다음과 같은 main.tf를 작성한다.
provider "aws" {
    region = "ap-northeast-2"
}

resource "aws_instance" "ec2" {
    ami = "ami-0094965d55b3bb1ff"
    instance_type = "t2.micro"
}
EC2 인스턴스를 추상화한 aws_instance 리소스를 정의한다. Required field가 2개 있는데 하나는 AMI의 ID를 의미하는 ami와 인스턴스 타입 'instance_type'이다. AMI ID는 Region마다 다르며, 찾는 방법은 링크를 참고하기 바란다.
참고로 위 EC2 인스턴스는 따로 VPC를 지정하지 않았기 때문에, Default VPC에 생성된다.
다음은 'terraform apply' 결과이다. 인스턴스가 바로 생성되지는 않고, 30초에서 1분 정도 소요된다.

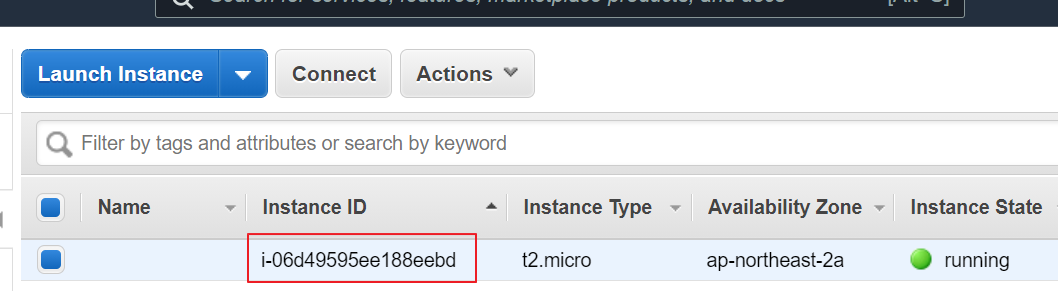
Terraform을 통해 ID가 'i-06d49595ee188eebd'인 ec2 인스턴스가 생성된 것을 알 수 있다. AWS 콘솔에서도 동일한 결과를 확인 가능하다.
기본적인 ec2 인스턴스 생성 방법은 이해했으니, 'terraform destroy' 명령어로 제거하도록 하자.
Elastic IP(EIP)
Elastic IP는 Instance가 고정 Public IP로, 인스턴스가 재가동된 뒤에도 항상 동일한 IP를 가진다. 기존 main.tf에 EIP를 추가하고, ec2 인스턴스에 할당하는 방법에 대해 알아보자. 아래 코드처럼 생각보다 간단하다.
provider "aws" {
    region = "ap-northeast-2"
}

resource "aws_instance" "ec2" {
    ami = "ami-0094965d55b3bb1ff"
    instance_type = "t2.micro"
}

resource "aws_eip" "elasticip" {
    instance = aws_instance.ec2.id
}

output "EIP" {
    value = aws_eip.elasticip.public_ip
}
aws_eip는 EIP를 추상화한 리소스로, instance 필드에 ec2 인스턴스 ID를 지정함으로써 어떤 instance에 할당될지 결정할 수 있다. 작업이 완료되면, EIP라는 이름으로 'elasticip'의 Public IP가 콘솔에 출력된다. 다음은 'terraform apply' 명령어 수행결과이다.

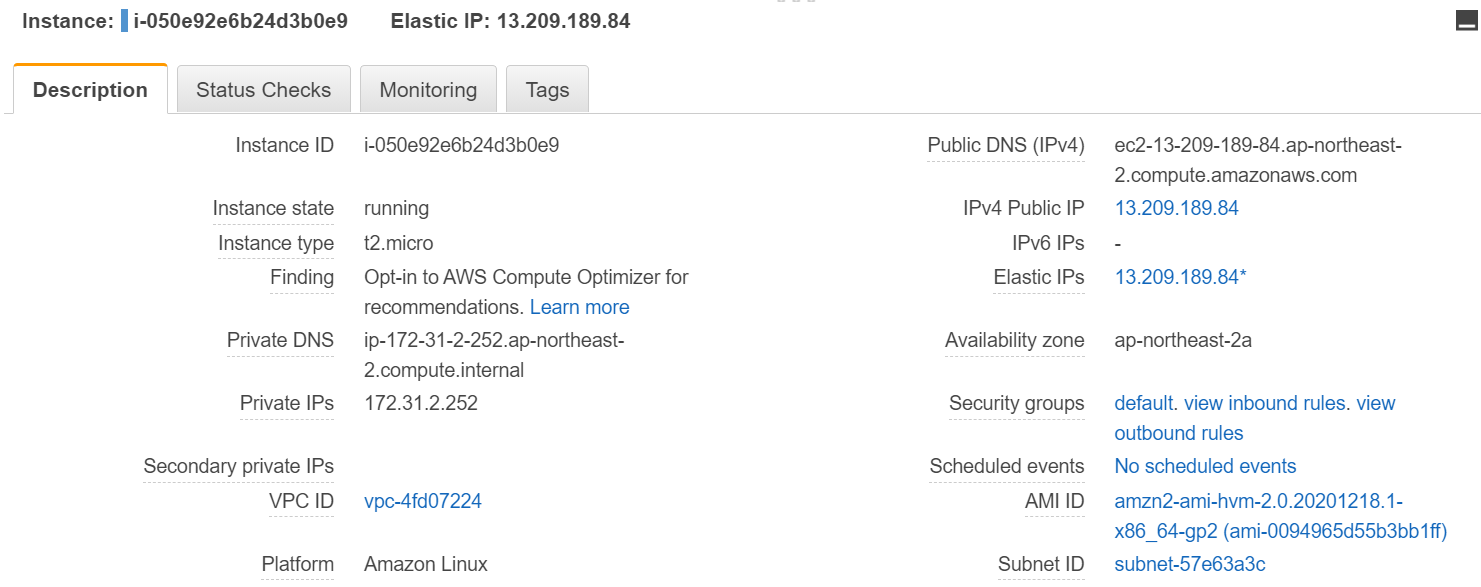
실제 AWS 콘솔에서 확인한 EC2 인스턴스도 동일한지 확인해보자. Elastic IP '13.209.189.82'가 할당된 것을 알 수 있다.
확인이 끝났다면 마찬가지로 'terraform destroy' 명령어로 리소스를 제거하자.
Security Group
Security Group은 AWS에서 제공하는 Stateful Firewall로 EC2 인스턴스에 적용 가능하다. Terraform은 'aws_security_group'이라는 리소스로 Security Group을 추상화하였으며, 다음은 ingress/egress 트래픽에 대해 HTTPS 포트(443)만 허용하는 예시이다.
provider "aws" {
region = "ap-northeast-2"
}
resource "aws_instance" "ec2" {
ami = "ami-0094965d55b3bb1ff"
instance_type = "t2.micro"
security_groups = [aws_security_group.webtraffic.name]
}
resource "aws_security_group" "webtraffic" {
name = "Allow HTTPS"
ingress = [{
from_port = 443
to_port = 443
protocol = "TCP"
cidr_blocks = ["0.0.0.0/0"]
description = null
ipv6_cidr_blocks = null
prefix_list_ids = null
security_groups = null
self = null
}]
egress = [{
from_port = 443
to_port = 443
protocol = "TCP"
cidr_blocks = ["0.0.0.0/0"]
description = null
ipv6_cidr_blocks = null
prefix_list_ids = null
security_groups = null
self = null
}]
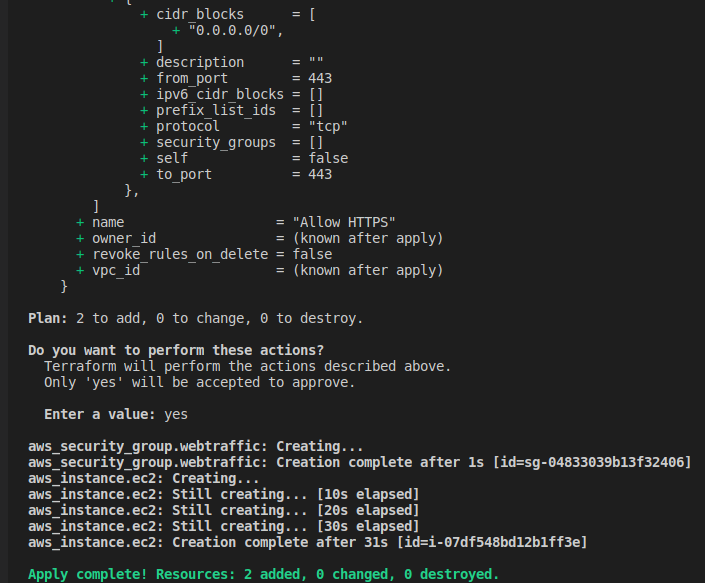
}이전에 작성한 코드보다 복잡해보이지만, ingress, egress 정의에 필요한 필드가 많을 뿐 크게 어려운 내용은 없다. 참고로 from_port와 to_port는 Port 번호 범위를 의미한다. 무엇보다 'aws_instance.ec2.security_groups' 필드에 Terraform에서 정의한 aws_security_group의 name을 추가하는 것에 집중하자. 다음은 'terraform apply' 명령어 결과이다.
AWS 콘솔에서도 새로 생성된 Security Group 'Allow HTTPS'와 이를 사용하는 EC2 인스턴스를 확인 가능하다.


Dynamic Blocks
이번에는 Programming 방식으로 list를 순회하면서, 여러개의 Ingress/Egress Rule을 추가하는 방법인 Dynamic block에 대해 알아보자.
provider "aws" {
    region = "ap-northeast-2"
}

variable "ingressrules" {
    type = list(number)
    default = [80,443]
}

variable "egressrules" {
    type = list(number)
    default = [80,443,25,3306,53,8080]
}

resource "aws_instance" "ec2" {
    ami = "ami-0094965d55b3bb1ff"
    instance_type = "t2.micro"
    security_groups = [aws_security_group.webtraffic.name]
}

resource "aws_security_group" "webtraffic" {
    name = "Allow HTTPS"

    dynamic "ingress" {
        iterator = port
        for_each = var.ingressrules
        content {
            from_port = port.value
            to_port = port.value
            protocol = "TCP"
            cidr_blocks = ["0.0.0.0/0"]
            description = null
            ipv6_cidr_blocks = null
            prefix_list_ids = null
            security_groups = null
            self = null
        }
    }

    dynamic "egress" {
        iterator = port
        for_each = var.egressrules
        content {
            from_port = port.value
            to_port = port.value
            protocol = "TCP"
            cidr_blocks = ["0.0.0.0/0"]
            description = null
            ipv6_cidr_blocks = null
            prefix_list_ids = null
            security_groups = null
            self = null
        }
    }
}
우선 list(number) 타입의 변수인 ingressrules와 egressrules를 정의한다. 그리고 aws_security_group.webtraffic의 ingress와 egress 필드를 위와 같이 작성한다. 'port'는 for_each loop을 통해 list에서 가져오는 각각의 value를 담을 수 있는 iterator이다. 결과적으로 ingress, egress 모두 list 타입으로 생성될 것이다. 다음은 'terraform apply' 명령어 결과이다.

AWS 콘솔에서 Security Group 'Allow HTTPS', 특히 Inbound와 Outbound 부분을 확인해보자.


참고
'IaC' 카테고리의 다른 글
| Terraform - (6) IAM (0) | 2021.06.18 |
|---|---|
| Terraform - (5) Modules (0) | 2021.06.10 |
| Terraform - (3) Variables (0) | 2021.06.07 |
| Terraform - (2) 기본 사용법 (0) | 2021.06.06 |
| Terraform - (1) 소개 및 설치 (0) | 2021.03.29 |