Behavioral Analytics
strace
strace는 Debugging 목적으로 프로세스의 system call 호출을 intercept하여 로그를 남기는 Linux 명령어이다. 다음은 'ls' 에서 어떤 system call을 사용하는지 strace로 확인한 내용이다. 비교적 간단한 프로세스임에도 불구하고 fstat, mmap 등수많은 system call을 사용하고 있음을 알 수 있다.

'-cw' 옵션을 추가하면 다음과 같이 해당 프로세스의 system call 사용 현황을 요약하여 볼 수 있다.

현재 실행중인 ETCD 컨테이너 안의 etcd 프로세스의 PID를 확인해보자.
ps aux | grep etcd
command를 확인하면, etcd의 PID가 3623인 것을 알 수 있다. strace를 사용해 해당 프로세스의 system call 호출을 확인해보자.
strace -f -p 3623
어떤 system call을 많이 호출하는지 확인할 수도 있다.
strace -cw -p 3623
/proc 디렉토리 조회
PID=3623 프로세스의 /proc 디렉토리를 확인해보자.

하위 디렉토리 중 'fd'는 해당 프로세스에서 사용 중인 file descriptor를 모아놓은 곳으로, 이 중 파일 '7'은 DB를 가리키고 있는 것을 알 수 있다.

왠지 해당 파일을 확인하면 K8s 리소스를 가져올 수 있을 것 같다. 이를 테스트하기 위해 K8s Secret을 하나 생성해보자.
kubectl create secret generic my-number --from-literal number=369369
다음 명령어로 파일 '7'에서 우리가 생성한 Secret 데이터가 있는지 확인할 수 있다.
cat 7 | strings | grep 369369 -A10 -B10
API 서버에 따로 Encryption Configuration을 정의하지 않았기 때문에, 모든 Secret이 평문으로 저장되므로 위와 같이 데이터가 노출되고 있다. 해커에게 root 권한만 있다면 위 정보를 탈취하는건 시간 문제라는 얘기이다.
프로세스의 Environment Variable 역시 /proc 디렉토리를 통해 확인할 수 있다. 먼저 다음과 같은 Pod을 추가한다.
apiVersion: v1
kind: Pod
metadata:
  labels:
    run: apache
  name: apache
spec:
  containers:
  - image: httpd
    name: apache
    env:
    - name: SECRET
      value: "123441234"
Pod 생성 후 환경 변수를 확인하면 'SECRET=123441234'가 존재한다.

해당 Pod이 생성된 Worker에서, httpd 프로세스를 찾아보자.
ps aux | grep httpd
무려 4개가 존재한다. 어떤 프로세스가 K8s를 통해 생성된 것인지 알 수 없으므로, 다음 명령어를 사용한다.
pstree -p
우리가 찾는 프로세스는 PID=29423이다. 이제 /proc 디렉토리를 확인해보자.
cat /proc/29432/environ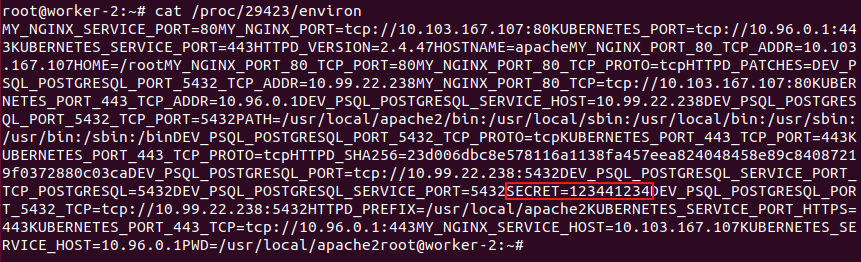
Secret을 환경변수로 정의할 경우, /proc 디렉토리에 read 권한이 있는 사용자에게 바로 노출이 된다는 점을 항상 유념해야 한다.
Falco
Cloud-native Runtime Security라는 기치를 내걸고 진행중인 CNCF의 프로젝트 중 하나이다. Kubernetes의 보안상 위협을 예방하는 Engine으로, 예상치 못한 Application 동작을 감지하여 경고를 발생하는 기능을 수행한다. 자세한 내용은 링크를 참고하기 바란다.
Falco
Runtime Security
falco.org
다음과 같이 Worker node에 Falco를 설치해보자.
curl -s https://falco.org/repo/falcosecurity-3672BA8F.asc | apt-key add -
echo "deb https://download.falco.org/packages/deb stable main" | tee -a /etc/apt/sources.list.d/falcosecurity.list
apt-get update -y
apt-get -y install linux-headers-$(uname -r)
apt-get install -y falco
다음 명령어로 Falco 서비스를 활성화 및 가동한다.
systemctl enable falco
systemctl start falco

systemctl status falco
아래 명령어로 falco에서 발생한 로그 메시지를 확인할 수 있다.
tail -f /var/log/syslog | grep falco
이제 Falco로 컨테이너 내부의 수상한 Process를 찾아보자. 우선 이전에 생성한 Pod 중 apache의 컨테이너 내부로 들어간다.
kubectl exec -it apache -- bashShell로 접근하자 마자, 해당 Worker에서 다음과 같은 로그가 출력되는 것을 알 수 있다. 컨테이너 안에서 shell이 생성되었음을 알리는 메시지다.

해당 컨테이너의 '/etc/passwd' 파일을 수정할 경우, Falco로부터 또 다른 메시지가 출력된다. '/etc' 디렉토리에 속한 파일이 변경된 것에 대해 경고를 하고 있다.


만약 사용자가 직접 apt 패키지를 추가하려고 한다면 다음과 같은 메시지를 확인할 수 있다.


Falco에 적용된 Default Rule은 '/etc/falco/falco_rules.yaml' 파일에 위치한다. 해당 파일에서 Shell 생성에 대한 Rule을 찾으면 다음과 같이 정의된 것을 알 수 있다.
# In some cases, a shell is expected to be run in a container. For example, configuration
# management software may do this, which is expected.
- macro: user_expected_terminal_shell_in_container_conditions
  condition: (never_true)

- rule: Terminal shell in container
  desc: A shell was used as the entrypoint/exec point into a container with an attached terminal.
  condition: >
    spawned_process and container
    and shell_procs and proc.tty != 0
    and container_entrypoint
    and not user_expected_terminal_shell_in_container_conditions
  output: >
    A shell was spawned in a container with an attached terminal (user=%user.name user_loginuid=%user.loginuid %container.info
    shell=%proc.name parent=%proc.pname cmdline=%proc.cmdline terminal=%proc.tty container_id=%container.id image=%container.image.repository)
  priority: NOTICE
  tags: [container, shell, mitre_execution]
K8s와 관련된 Rule은 같은 위치의 k8s_audit_rules.yaml 파일에 존재한다. 마찬가지로 다양한 Rule이 정의되어 있는데, 예를 들어 'Create Sensitive Mount Pod'이라는 Rule은 Pod의 'hostpath' volume이 보안상 위험한 경로(ex: /, /proc, /etc)를 사용할 경우, WARNING 레벨의 경고 메시지를 출력하도록 되어있다.
- macro: sensitive_vol_mount
  condition: >
    (ka.req.pod.volumes.hostpath intersects (/proc, /var/run/docker.sock, /, /etc, /root, /var/run/crio/crio.sock, /home/admin, /var/lib/kubelet, /var/lib/kubelet/pki, /etc/kubernetes, /etc/kubernetes/manifests))

- rule: Create Sensitive Mount Pod
  desc: >
    Detect an attempt to start a pod with a volume from a sensitive host directory (i.e. /proc).
    Exceptions are made for known trusted images.
  condition: kevt and pod and kcreate and sensitive_vol_mount and not ka.req.pod.containers.image.repository in (falco_sensitive_mount_images)
  output: Pod started with sensitive mount (user=%ka.user.name pod=%ka.resp.name ns=%ka.target.namespace images=%ka.req.pod.containers.image volumes=%jevt.value[/requestObject/spec/volumes])
  priority: WARNING
  source: k8s_audit
  tags: [k8s]
이번엔 Custom Rule을 직접 작성해보자. 완전히 새로운 Rule은 아니고, 기존 falco_rules.yaml 파일에 정의된 'Terminal shell in container'를 override할 것이다. '/etc/falco/falco_rules.local.yaml' 파일에 다음과 같은 내용을 추가한다.
- rule: Terminal shell in container
  desc: A shell was used as the entrypoint/exec point into a container with an attached terminal.
  condition: >
    spawned_process and container
    and shell_procs and proc.tty != 0
    and container_entrypoint
    and not user_expected_terminal_shell_in_container_conditions
  output: >
    %evt.time,%user.name,%container.name,%container.id
  priority: WARNING
  tags: [container, shell, mitre_execution]
output 메시지 형식과 priority를 수정하였다. output 메시지로 사용 가능한 Field 항목은 아래 링크를 참고하기 바란다.
Supported Fields for Conditions and Outputs
Introduction Here are the fields supported by Falco. These fields can be used in the condition key of a Falco rule and well as the output key. Any fields included in the output key of a rule will also be included in the alert's output_fields object when js
falco.org
변경된 내용을 적용하기 위해선 아래 명령어로 Falco 서비스를 재가동해야 한다.
systemctl restart falco이제 Shell 접근시 Falco 메시지가 어떻게 나오는지 확인해보자. Override한 Rule이 적용된 것을 확인할 수 있다.

실행중인 컨테이너의 불변성(Immutability)
컨테이너의 불변성이란 간단히 컨테이너는 실행중인 상태에서 내용이 변경될 수 없다는 것을 의미한다. 만약 업데이트가 필요한 경우, Image를 새로 빌드하고 컨테이너를 다시 생성해야 한다. 이를 통해 얻을 수 있는 이점은 다음과 같다.
- 고도화된 배포 방식 적용 가능
- Rollback 용이
- 안정성 향상
- 컨테이너 수준에서 높은 보안성
보통은 Image를 만들 때, 컨테이너 불변성을 강제할 수 있다. /bin 디렉토리의 파일을 모두 제거함으로써 Shell 접근을 막고, Filesystem을 read-only로 설정하거나 non-root user를 선택하는 등 다양한 방식이 존재한다. 하지만 우리가 Image를 수정할 권한이 없거나 곤란한 상황이라면 어떻게 해야할까?
StartupProbe
다행히도 K8s에서 제공하는 StartupProbe를 통해 이러한 문제를 해결 가능하다. StartupProbe는 LivenessProbe나 ReadinessProbe에 앞서서 먼저 실행되며 실패시 컨테이너를 재시작한다. 다음은 Filesystem을 read-only로 설정하는 startupProbe를 설정했을시 전체 workflow이다.

다음은 컨테이너의 /bin/bash를 삭제하는 StartupProbe를 적용한 Pod의 Manifest 예시이다.
apiVersion: v1
kind: Pod
metadata:
  labels:
    run: immutable
  name: immutable
spec:
  containers:
  - image: httpd
    name: immutable
    startupProbe:
      exec:
        command:
        - rm
        - /bin/bash
      initialDelaySeconds: 1
      periodSeconds: 5
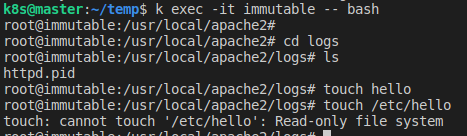
bash를 통해 컨테이너에 접근하려할 경우, 다음과 같은 에러가 발생한다.

SecurityContext
이번엔 SecurityContext를 통해 Root Filesystem을 read-only로 설정하는 방법에 대해 알아보자.
apiVersion: v1
kind: Pod
metadata:
  labels:
    run: immutable
  name: immutable
spec:
  containers:
  - image: httpd
    name: immutable
    securityContext:
      readOnlyRootFilesystem: true
위 파일을 그대로 사용할 경우, Pod은 정상적으로 생성되지 않고 다음과 같은 에러가 발생한다. 프로세스에서 지정된 경로에 필수적으로 생성해야할 파일을 쓸 수 없기 때문에 발생하는 문제다.

전체 Filesystem이 읽기 전용인 상태인데, 'readOnlyRootFilesystem' 항목은 true/false만 설정 가능할 뿐 다른 옵션이 존재하지 않기 때문에 대안이 필요하다. 정답은 다음과 같이 필요한 경로에 'emptyDir' 볼륨을 mount하는 것이다.
apiVersion: v1
kind: Pod
metadata:
  labels:
    run: immutable
  name: immutable
spec:
  containers:
  - image: httpd
    name: immutable
    securityContext:
      readOnlyRootFilesystem: true
    volumeMounts:
    - name: apache-log-dir
      mountPath: /usr/local/apache2/logs
  volumes:
  - name: apache-log-dir
    emptyDir: {}
'emptyDir' 볼륨을 mount한 경로에만 write 작업이 가능하며, 그 외 경로는 read-only로 설정된 것을 확인할 수 있다.
추가적으로 PodSecurityPolicy에서 'readOnlyRootFilesystem'을 강제하면, 더욱 강력하게 정책을 적용할 수 있다.
Auditing
API 서버의 Audit Logging 기능을 활성화하고, Log를 확인하는 방법에 대해 알아보자. 해당 기능은 API 서버에 Request가 전달될 때마다, '누가, 언제, 어떤 리소스에, 어떤 작업(verb)을 요청했는가?'를 기록하여, 지정된 저장소에 'Audit Log'라는 데이터로 저장하는 것을 의미한다.
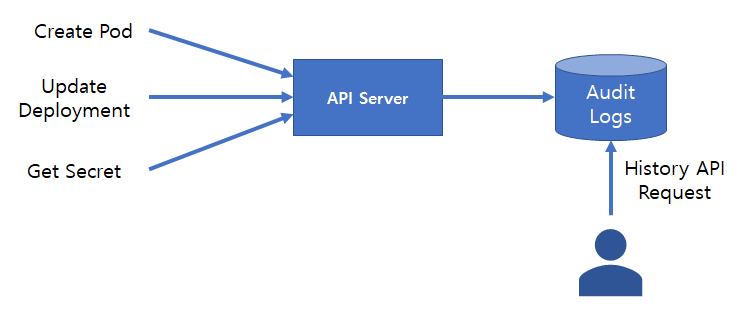
참고로 API Request는 아래 4개의 Stage 중 하나로 기록된다.
- RequestRecieved: Audit handler가 request를 받은 단계로, 다른 Handler에겐 아직 전달되지 않은 상태
- ResponseStarted: Response 헤더를 보냈지만, Body는 보내기 전 단계로 처리에 오랜 시간이 걸리는 일부 request(ex: watch)만 적용
- ResponseComplete: Response Body 전달을 완료한 상태
- Panic: 처리 중 panic 발생
Audit Log의 모든 데이터를 저장하기엔 용량, 트래픽 처리에 문제가 발생할 수 있다. 따라서 어떤 데이터를 기록할지에 대해 4개의 Level 중 하나를 선택해야 한다.
- None: 해당 이벤트를 기록하지 않음
- Metadata: Request의 metadata(사용자, timestamp, 리소스, verb 등)만 기록
- Request: Request의 metadata와 body를 기록하며, Response는 취급하지 않음. non-resource request에는 적용할 수 없음
- RequestResponse: 이벤트의 metadata, request, response를 모두 기록함. non-resource request에는 적용할 수 없음

참고로 Audit Log 저장소는 다양한 형식을 지원한다. JSON 형식의 로그를 Filesystem에 저장하거나, Webhook을 등록하여 외부 Backing Service를 사용할 수 있다. 이를 통해 ElasticSearch, Fluentd와의 연계가 가능하다.
API 서버의 Audit Logging 기능 활성화
'/etc/kubernetes' 하위에 audit 디렉토리를 생성 후 이동한다.
mkdir -p /etc/kubernetes/audit && cd /etc/kubernetes/audit해당 경로에 policy.yaml을 아래와 같이 추가한다. 모든 이벤트에 대해 Metadata만 저장하는 Policy이다.
apiVersion: audit.k8s.io/v1
kind: Policy
rules:
- level: Metadata
'/etc/kubernetes/manifests/kube-apiserver.yaml'을 다음 항목을 추가한다.
#...
spec:
  containers:
  - command:
    - kube-apiserver
    - --audit-policy-file=/etc/kubernetes/audit/policy.yaml       # add
    - --audit-log-path=/etc/kubernetes/audit/logs/audit.log       # add
    - --audit-log-maxsize=500                                     # add
    - --audit-log-maxbackup=5                                     # add
#...
    volumeMounts:
    #...
    - mountPath: /etc/kubernetes/audit      # add
      name: audit                           # add
#...
  volumes:
  - hostPath:                               # add
      path: /etc/kubernetes/audit           # add
      type: DirectoryOrCreate               # add
    name: audit                             # add
#...- --audit-policy-file: Audit Policy를 정의한 파일 경로를 의미하며, 위에서 추가한 policy.yaml을 적용하였다.
- --audit-log-path: Audit Log가 저장될 파일 경로이며, JSON 형식으로 출력된다.
- --audit-log-maxsize: 로그 파일 하나당 저장할 수 있는 최대 크기(MB 단위)이며, 그보다 큰 경우 다른 file로 rotate된다.
- --audit-log-maxbackups: 백업 파일의 최대 갯수를 의미한다.
나머지는 audit 디렉토리를 컨테이너 안에서 mount 하는 설정이므로 설명은 생략한다. API 서버 Pod의 재생성이 완료되었다면, /etc/kubernetes/audit/logs/audit.log 파일을 확인해보자. 실시간으로 수많은 이벤트가 logging 되는 것을 알 수 있다.
tail -f /etc/kubernetes/audit/logs/audit.log
Secret 생성 및 Audit Log 확인
우선 아래와 같이 간단한 Secret을 하나 생성한다.
kubectl create secret generic my-secret --from-literal hello=worldaudit.log 파일에 이 작업 요청이 실제로 기록되었는지 확인해보자.
cat /etc/kubernetes/audit/logs/audit.log | grep my-secret
{
   "kind":"Event",
   "apiVersion":"audit.k8s.io/v1",
   "level":"Metadata",
   "auditID":"6ff95acf-f332-4c07-a74f-95d865fd8906",
   "stage":"ResponseComplete",
   "requestURI":"/api/v1/namespaces/default/secrets?fieldManager=kubectl-create",
   "verb":"create",
   "user":{
      "username":"kubernetes-admin",
      "groups":[
         "system:masters",
         "system:authenticated"
      ]
   },
   "sourceIPs":[
      "172.30.1.42"
   ],
   "userAgent":"kubectl/v1.20.2 (linux/amd64) kubernetes/faecb19",
   "objectRef":{
      "resource":"secrets",
      "namespace":"default",
      "name":"my-secret",
      "apiVersion":"v1"
   },
   "responseStatus":{
      "metadata":{

      },
      "code":201
   },
   "requestReceivedTimestamp":"2021-05-08T05:48:47.438230Z",
   "stageTimestamp":"2021-05-08T05:48:47.442307Z",
   "annotations":{
      "authorization.k8s.io/decision":"allow",
      "authorization.k8s.io/reason":""
   }
}
Request의 Metadata가 정상적으로 logging 된 것을 확인할 수 있다.
Audit Policy 심화
모든 Request에 대해 Metadata만 저장하는 것은 상당히 비효율적일 뿐 아니라, 디테일한 내용을 알 수 없는 문제점이 있다. 다음과 같이 조금 더 복잡한 Audit Policy를 정의해보자.
- RequestRecieved stage는 기록하지 않음(Nothing)
- "get", "watch", "list" verb는 기록하지 않음(Nothing)
- Secret은 metadata level을 기록
- 나머지는 모두 RequestResponse level을 기록
apiVersion: audit.k8s.io/v1
kind: Policy
omitStages:
- "RequestReceived"
rules:
- level: None
  verbs: ["get", "list", "watch"]

- level: Metadata
  resources:
  - group: ""
    resources: ["secrets"]

- level: RequestResponse
단순히 policy.yaml 파일을 수정한 것만으로는 API 서버에 적용되지 않으며, API 서버 Pod을 한번 재생성해야 한다. 이를 위해 '/etc/kubernetes/manifests/kube-apiserver.yaml' 파일을 조금 수정하고 저장한 뒤 다시 원복시키자. 그 다음 audit.log 파일을 확인하면 기존 로그와 많은 차이가 있는 것을 알 수 있다.
tail -f /etc/kubernetes/audit/logs/audit.log{
"kind":"Event",
"apiVersion":"audit.k8s.io/v1",
"level":"RequestResponse",
"auditID":"ce19f5f6-5a0a-473b-97ae-1fa5c9211417",
"stage":"ResponseComplete",
"requestURI":"/apis/coordination.k8s.io/v1/namespaces/kube-system/leases/kube-scheduler?timeout=10s",
"verb":"update",
"user":{
"username":"system:kube-scheduler",
"groups":[
"system:authenticated"
]
},
"sourceIPs":[
"172.30.1.42"
],
"userAgent":"kube-scheduler/v1.20.2 (linux/amd64) kubernetes/faecb19/leader-election",
"objectRef":{
"resource":"leases",
"namespace":"kube-system",
"name":"kube-scheduler",
"uid":"acc9ecd9-fda5-4279-8789-163760c385a5",
"apiGroup":"coordination.k8s.io",
"apiVersion":"v1",
"resourceVersion":"977037"
},
"responseStatus":{
"metadata":{
},
"code":200
},
"requestObject":{
"kind":"Lease",
"apiVersion":"coordination.k8s.io/v1",
"metadata":{
"name":"kube-scheduler",
"namespace":"kube-system",
"uid":"acc9ecd9-fda5-4279-8789-163760c385a5",
"resourceVersion":"977037",
"creationTimestamp":"2021-01-15T13:17:08Z",
"managedFields":[
{
"manager":"kube-scheduler",
"operation":"Update",
"apiVersion":"coordination.k8s.io/v1",
"time":"2021-01-15T13:17:08Z",
"fieldsType":"FieldsV1",
"fieldsV1":{
"f:spec":{
"f:acquireTime":{
},
"f:holderIdentity":{
},
"f:leaseDurationSeconds":{
},
"f:leaseTransitions":{
},
"f:renewTime":{
}
}
}
}
]
},
"spec":{
"holderIdentity":"master_2c4e3058-f187-48ec-90e1-8a35721510ae",
"leaseDurationSeconds":15,
"acquireTime":"2021-05-06T13:01:33.887258Z",
"renewTime":"2021-05-08T06:10:44.894871Z",
"leaseTransitions":57
}
},
"responseObject":{
"kind":"Lease",
"apiVersion":"coordination.k8s.io/v1",
"metadata":{
"name":"kube-scheduler",
"namespace":"kube-system",
"uid":"acc9ecd9-fda5-4279-8789-163760c385a5",
"resourceVersion":"977041",
"creationTimestamp":"2021-01-15T13:17:08Z",
"managedFields":[
{
"manager":"kube-scheduler",
"operation":"Update",
"apiVersion":"coordination.k8s.io/v1",
"time":"2021-01-15T13:17:08Z",
"fieldsType":"FieldsV1",
"fieldsV1":{
"f:spec":{
"f:acquireTime":{
},
"f:holderIdentity":{
},
"f:leaseDurationSeconds":{
},
"f:leaseTransitions":{
},
"f:renewTime":{
}
}
}
}
]
},
"spec":{
"holderIdentity":"master_2c4e3058-f187-48ec-90e1-8a35721510ae",
"leaseDurationSeconds":15,
"acquireTime":"2021-05-06T13:01:33.887258Z",
"renewTime":"2021-05-08T06:10:44.894871Z",
"leaseTransitions":57
}
},
"requestReceivedTimestamp":"2021-05-08T06:10:44.899567Z",
"stageTimestamp":"2021-05-08T06:10:44.905208Z",
"annotations":{
"authorization.k8s.io/decision":"allow",
"authorization.k8s.io/reason":"RBAC: allowed by ClusterRoleBinding \"system:kube-scheduler\" of ClusterRole \"system:kube-scheduler\" to User \"system:kube-scheduler\""
}
}
'Kubernetes > Certificates' 카테고리의 다른 글
| [CKS] 취득 후기 (4) | 2021.05.23 |
|---|---|
| [CKS] Supply Chain Security (0) | 2021.05.16 |
| [CKS] Minimize Microservice Vulnerabilities (0) | 2021.05.03 |
| [CKS] System Hardening (0) | 2021.05.02 |
| [CKS] Cluster Hardening (0) | 2021.05.01 |